
Installing a railing post on concrete starts with one important detail: using the correct size drill bit for your concrete wedge anchor.
This is also one of the most common installation questions we receive. Customers often have the wedge anchors in hand but aren’t sure what size masonry bit they need—or how to determine the actual diameter of the anchor.
Fortunately, choosing the correct drill bit is easier than it may seem.
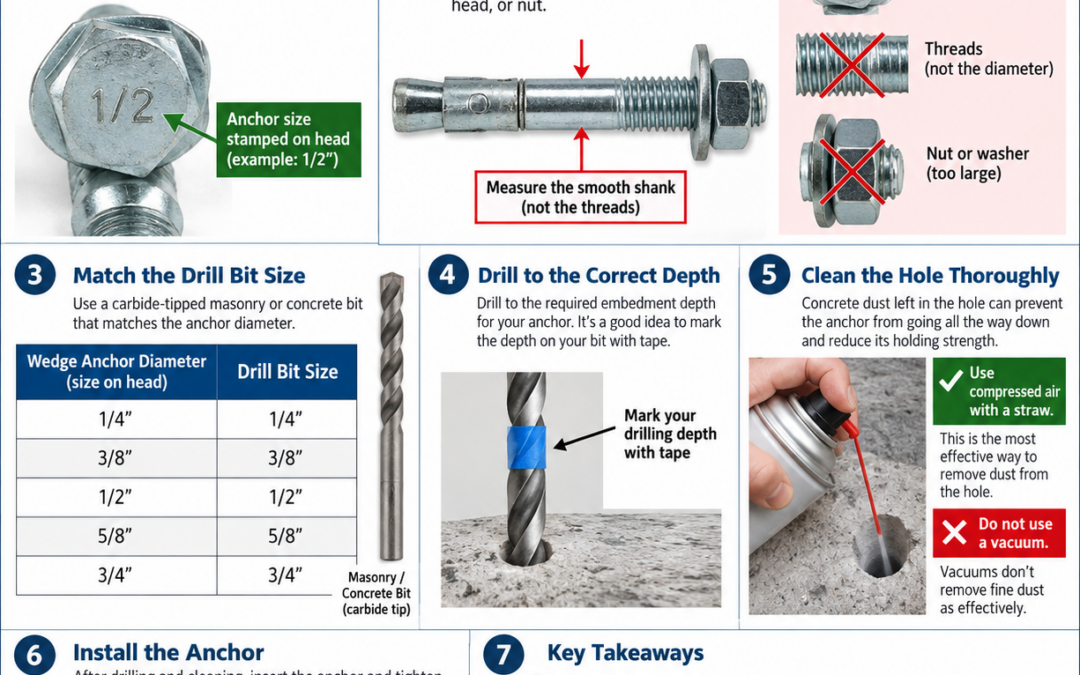
The Basic Rule: Match the Drill Bit to the Wedge Anchor Diameter
For most standard concrete wedge anchors, the diameter of the drill bit should match the diameter of the wedge anchor.
For example:
| Wedge Anchor Diameter | Drill Bit Size |
|---|---|
| 1/4″ | 1/4″ masonry bit |
| 3/8″ | 3/8″ masonry bit |
| 1/2″ | 1/2″ masonry bit |
| 5/8″ | 5/8″ masonry bit |
| 3/4″ | 3/4″ masonry bit |
Always follow the specifications provided by the anchor manufacturer, but don’t automatically choose a larger drill bit because the anchor looks slightly larger than the hole you expect it to fit into. Wedge anchors are designed to expand and grip the concrete when tightened.
Check the Head of the Wedge Anchor First
If you’re using the concrete wedge anchors supplied with our railing products, determining the anchor size is especially easy.
Look at the head of the bolt. The anchor size is stamped directly on the head.
This marking tells you the nominal diameter of the wedge anchor and, in turn, the masonry drill bit size you need.
For example, if the head is marked 1/2″, you would normally use a 1/2″ concrete or masonry drill bit.
This eliminates the need to guess based on how large the bolt looks.
What If You Can’t Read the Marking?
If the size marking is missing or difficult to read, you can determine the anchor diameter by measuring it.
The important part is knowing where to measure.
Measure the diameter of the main body or threaded shank of the wedge anchor—not the nut, washer, bolt head, or expanding portion at the bottom.
A caliper is the easiest and most accurate tool for doing this.
For example, if the body of the anchor measures approximately 1/2″ in diameter, you have a 1/2″ wedge anchor and would typically use a 1/2″ masonry bit.
Don’t Measure the Bolt Head
This is where many people get confused.
A 1/2″ wedge anchor does not mean the bolt head measures 1/2″ across. The head or nut will be larger because it needs to accommodate a wrench or socket.
The anchor size refers to the diameter of the anchor’s body.
Think of it this way:
Anchor body diameter = drill bit size
—not—
Bolt head size = drill bit size
Use a Bit Designed for Concrete
Correct diameter is only part of choosing the right drill bit.
Concrete should be drilled with a carbide-tipped masonry or concrete bit designed for the type of drill you’re using.
For most railing-post installations, a hammer drill or rotary hammer makes drilling significantly easier than a standard drill. A rotary hammer can be particularly helpful when drilling multiple holes or working with harder concrete.
Before drilling, make sure the bit is the correct diameter and is compatible with your drill or rotary hammer.
Don’t Make the Hole Larger to Make Installation Easier
It can be tempting to move up one drill-bit size if the wedge anchor seems difficult to insert.
Don’t.
A wedge anchor relies on the concrete surrounding the hole to develop its holding strength. An oversized hole may prevent the anchor from expanding and gripping the concrete as intended.
If the correct-size anchor doesn’t slide into the hole easily, first check the hole for concrete dust and debris rather than reaching for a larger drill bit.
Clean the Hole Before Installing the Anchor
Drilling creates a considerable amount of concrete dust, and some of that material remains inside the hole.
After drilling to the required depth, thoroughly clean the hole according to the anchor manufacturer’s installation instructions before inserting the wedge anchor.
A clean, properly sized hole allows the anchor to seat and expand as intended.
Check Your Hole Depth Too
Diameter isn’t the only measurement that matters.
Your hole must also be deep enough for the wedge anchor being installed. Required embedment depth can vary depending on the anchor, concrete conditions, application, and installation requirements.
Avoid assuming that all anchors of the same diameter require the same drilling depth. Follow the specifications for the particular wedge anchor you’re installing.
It’s also a good idea to mark the required drilling depth directly on your masonry bit before you begin.
A Quick Way to Remember It
When selecting a drill bit for a concrete wedge anchor, remember these three steps:
1. Check the bolt head for the anchor size.
Our wedge anchors have the size marked on the head.
2. If necessary, measure the diameter of the anchor body.
Don’t measure the nut, washer, or bolt head.
3. Match the masonry bit to the specified anchor diameter.
A 1/2″ wedge anchor normally requires a 1/2″ masonry bit, a 3/8″ anchor normally requires a 3/8″ bit, and so on.
Installing Railing Posts on Concrete
When mounting an aluminum railing post to an existing concrete surface, the connection is only as good as the installation beneath it. Using the correct anchor, drilling the proper diameter and depth, cleaning the hole, and following the anchor manufacturer’s installation requirements are all important parts of creating a secure post connection.
If you’re installing one of our railing systems and aren’t sure which anchor, drill bit, or mounting method is appropriate for your project, contact us before drilling. We’re happy to help you identify the correct components for your application.
Installation Note: Always verify anchor requirements for your specific application and follow the anchor manufacturer’s installation instructions. Concrete condition, edge distance, embedment depth, anchor spacing, and applicable building-code requirements can affect anchor performance.
Recent Comments